M-21-31 represents the current expectation for Federal Government Agencies in the United States and Australia. It recognises the necessity of Security Operations moving to a Big Data framework for data collection and archive.
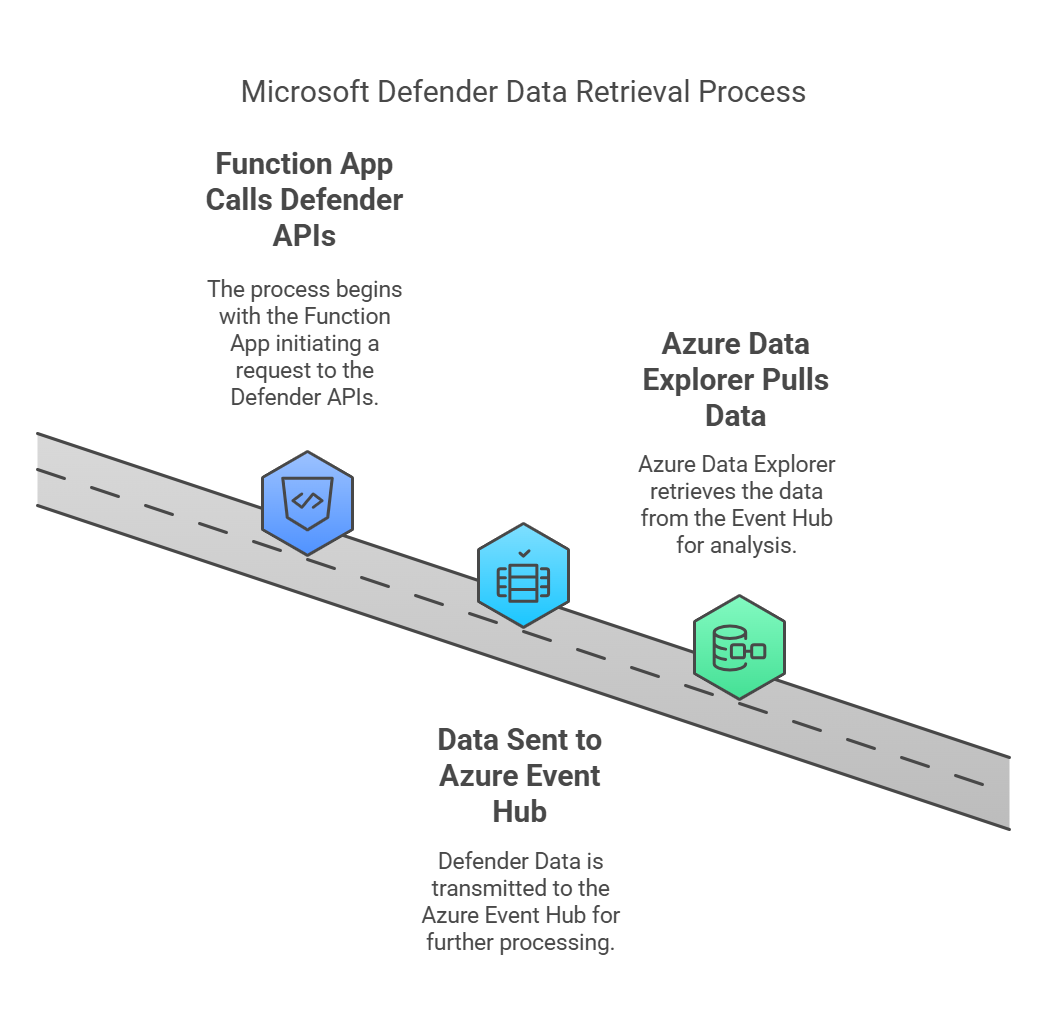
The amount of information that can be generated daily in an Enterprise environment with Microsoft Defender is enormous. So much so that Microsoft hasn't tried to provide ingestion paths into Microsoft Sentinel as the costs would be astronomic. However, this is a prefect use case for Azure Data Explorer (ADX) and demonstrating the use of Azure Durable Functions.
This blog post follows the previous PowerShell Core - Durable Functions - A Security Engineer's Introduction post. It's intended for beginners to get exposure to PowerShell Core Durable Functions while providing a solution for large scale archiving of Security data.
Why use a Durable Function?
The rate limit for the Defender Vulnerability API is typically set at 50 calls per minute and 1500 calls per hour. It is not uncommon for environments to have thousands of machines receiving Defender telemetry data. Durable functions are ideal for very long running processes.
Architecture Overview
The content is an annotation of these Github Source Files.
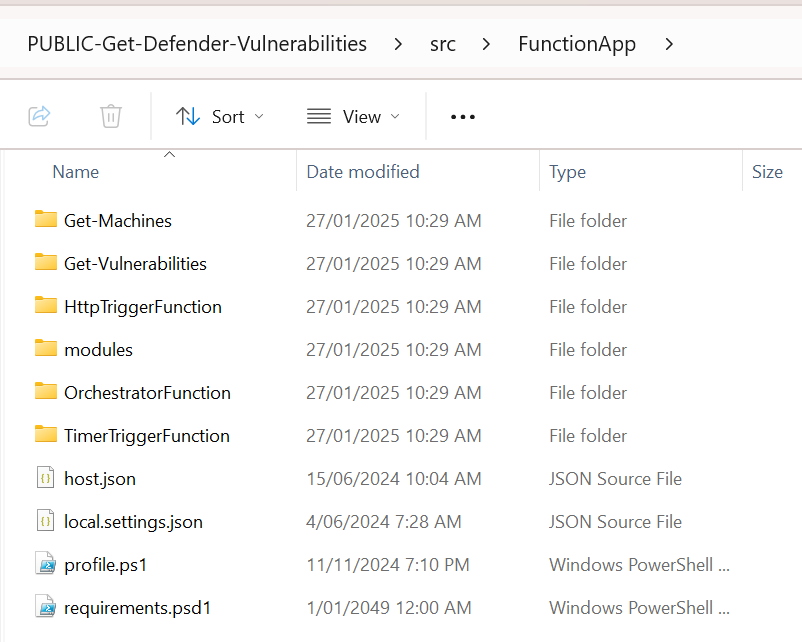
All Function Apps must be considered from both the infrastructure layer (which deployes the actual application and properties seen in the Azure portal) and the code layer. This project places Bicep templates under the 'infrastructure' folder and PowerShell application code under the "Src" folder.
Let's start with the PowerShell function infrastructure.
Bicep Overview (Infrastructure)
I want to highlight a few elements from the main.bicep file of this project.
User Assigned Managed Identity
// Get existing managed identity resource
resource managedIdentity 'Microsoft.ManagedIdentity/userAssignedIdentities@2023-01-31' existing = {
  name: last(split(userAssignedIdentityResourceId, '/'))
}
Most of our Function Apps wll need to use a Managed Identity, either for accessing Key Vaults or for using permissions directly with Modern Auth for external systems (like the Defender APIs).
Whenever we assign roles or permissions to a managed identity it will take hours for the tokens on these identities to become active. Using dedicated Managed Identities that can be attached to by a number of different Functions is helpful. It also lets me preserve permissions if I need to completely destroy a webapp and reprovision it completely differently.
User Assigned Managed Identity Permissions...
Follow the documentation here on how to assign Defender permissions to your Managed Identity to be able to use the Defender APIs:
https://github.com/LaurieRhodes/PUBLIC-Get-Defender-Vulnerabilities/blob/main/docs/Identity.md
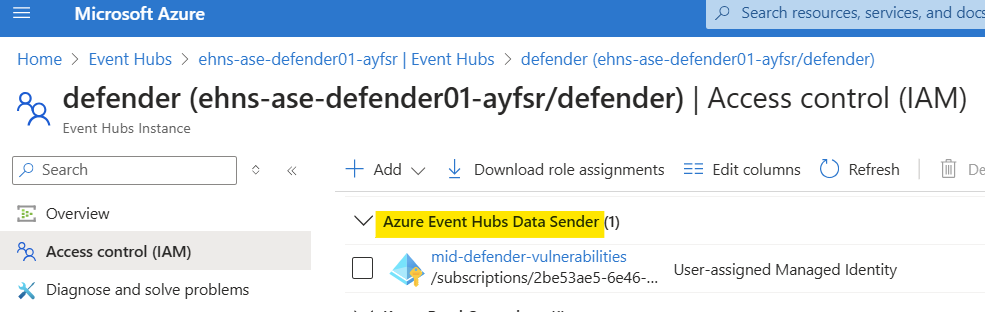
You will also need to give your Managed Identity Azure Event Hubs Data Sender permissions to your nominated Event Hub.
Hosting Plan
resource hostingPlan 'Microsoft.Web/serverfarms@2021-03-01' = {
  name: hostingPlanName
  location: location
  sku: {
    name: 'Y1'
    tier: 'Dynamic'
  }
  properties: {}
}
A Hosting Plan is dedicated compute to fun serverless apps from. As the collection of Function Apps grow, especially long running apps, using a centralised Hosting Plan will become unavoidable. Remember that Function Apps and Logic Apps can share the same Hosting Plan.
Function App - App Settings
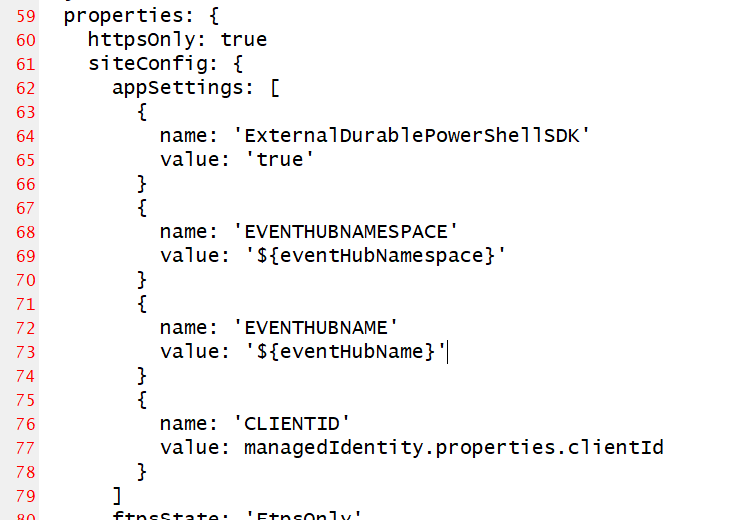
The App Settings element of the Function App will be accessible as shell environment variables by the application when it runs. It gives us the ability to bridge between Infrastructure provisioning with CI/CD and utilising dynamic variables within PowerShell code.
- I am setting Event Hub details with my Bicep code which will be used in my data pipeline to get information into Azure Data Explorer.
- I am also retrieving the Client ID from the specified Managed Identity. This will be needed for my PowerShell functions to be able to authenticate with that Identity.
Function App PowerShell Code
Let's now discuss the PowerShell functions running within the Function App.
The code of the Durable Function consists of four main components:
- Timer Trigger Function
- Orchestrator Function
- Get-Machines Activity Function
- Get-Vulnerabilities Activity Function
Data Flow
- Timer triggers the orchestrator
- Orchestrator gets list of machines
- For each machine, vulnerability data is retrieved
- Each vulnerability record is sent to Event Hub
- External systems can then process the Event Hub data
Timer Trigger Function: The Starting Point
The Timer Trigger function serves as the entry point for the entire process. It's a simple component that initiates the orchestration:
The first thing to notice is that Orchestrator and Activity functions all reside in their own folders. Each folder contains a function.json file and a PowerShell Script. These files 'bind' each of the functions tegether, determining the flow of how the various functions relate to eachother.
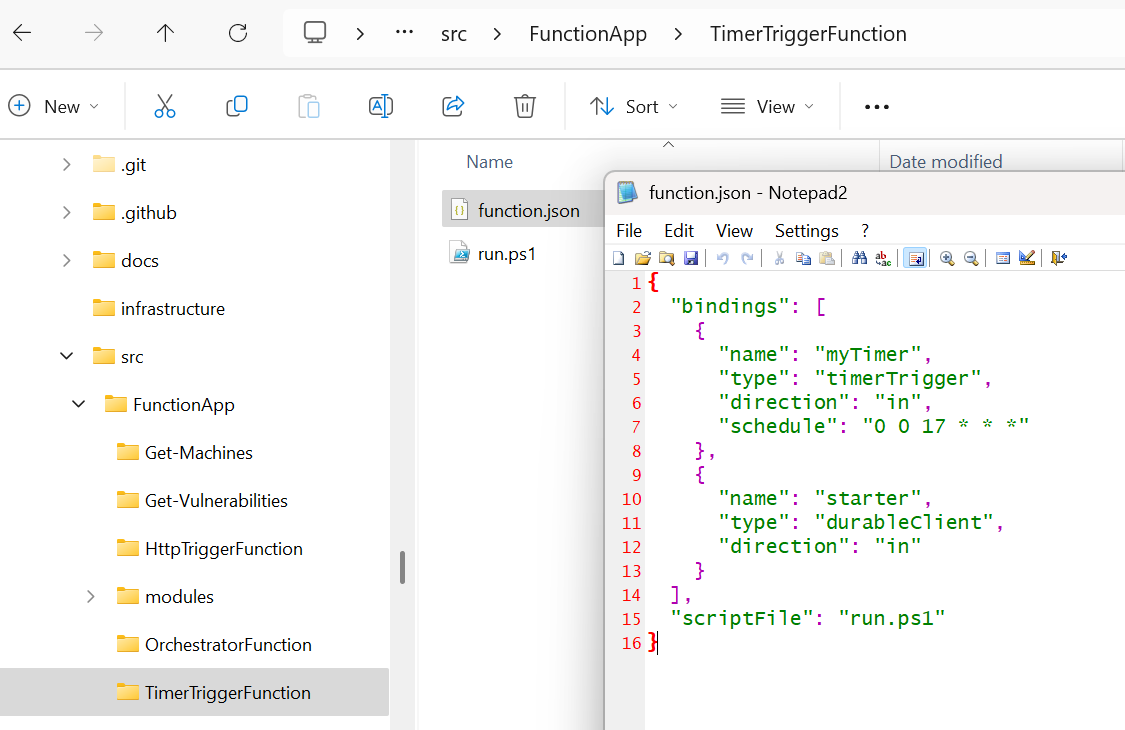
With this project, we trigger the timer function to start on a Cron schedule.
The schedule "0 0 17 * **" means:
- 0 minutes
- 0 hours
- 17:00 (5 PM)
- Every day of the month (*)
- Every month (**)
- Every day of the week (**) So this function will trigger daily at 5:00 PM.
Durable Client Binding:
{
  "name": "starter",         // Parameter name for the durable client
  "type": "durableClient",   // Specifies this is a durable function client
  "direction": "in"          // Input binding
}- This binding enables the function to interact with the Durable Functions framework
- The "starter" parameter allows the function to start new orchestrations
The scriptFile property at the root points to the PowerShell script (run.ps1) that contains the actual function logic. The only purpose of the PowerShell script is to initiate the Durable Orchestrator, which is done with a simpel line of PowerShell code within the run.ps1 file:
$instanceId = Start-DurableOrchestration -FunctionName "OrchestratorFunction"The -FunctionName parameter specifies which orchestrator function to start - in this case "OrchestratorFunction" which corresponds to the function in the OrchestratorFunction folder that contains its own run.ps1. The Start-DurableOrchestration cmdlet works in direct connection with the durableClient binding declared in function.json. The Start-DurableOrchestration cmdlet is essentially a wrapper around this durable client binding, using it to ccreate a new orchestration instance
Orchestrator Function: The Conductor
The Orchestrator function acts as the conductor of the entire process, coordinating the execution of activity functions in a specific sequence. It handles two main tasks:
- Retrieving a list of machines
- Processing vulnerabilities for each machine
Here's how it works:
As with other functions, its function.json declares its bindings. The inbound object we receive is an Orchestration trigger, which will run the named PowerShell file within the Orchestrator directory. The name of the inbound properties object in this example is "context" although it can be anything although the name must match the parameter variable name in the PowerShell script that is called.
{
  "bindings": [
    {
      "name": "context",
      "type": "orchestrationTrigger",
      "direction": "in"
    }
  ],
  "scriptFile": "run.ps1"
}
The PowerShell script is minimalistic as any real work will be carried out with the Activity functions that are called. Let's walk through the pieces of the Orchestrator PowerShell script.
This Orchestrator only has two tasks.
Task 1: Get Machines List
param($context)

$DebugPreference = 'Continue'

Write-Debug "Orchestrator function started at: $(Get-Date)"


<#
  Task 1.   Get Machine List
#>


write-debug "Starting Invoke-DurableActivity -FunctionName Get-Machines"
$GetMachineTask = Invoke-DurableActivity -FunctionName "Get-Machines"
$DecodedText = [System.Text.Encoding]::ASCII.GetString([System.Convert]::FromBase64String($GetMachineTask))
$machineRecordCollection = ConvertFrom-Json -inputobject $DecodedText
write-debug "Invoke-DurableActivity Get-Machines complete"
We start with the param block which receives the 'context' object. If this particular Orchestrator was receiving variables as input (like an thhp initiated function) we might use the variables within that object as part of our workflow. This example isn't that complex
If you want to be able to support Debug logging in your application, you have to set $DebugPreference = 'Continue' as you would normally in PowerShell.
The Durable Function will use bindings and the Invoke-DurableActivity command to call the function 'Get-Machines'
What this code demonstrates is a workaround for a limitation over passing JSON between functions. Unfortunately, bindings dont support passing complex types of objects between functions nor can you pass nested levels of JSON. We can get around this by encoding complex JSON objects as a Base64 strings and decode the strings within the Activity functions. As you create more complex Durable Functions this workaround becomes critical!
The Activity Function is going to retrieve an up-to-date list of all machines sending vulnerability data. Once that list has been obtained, the list will be passed to the second Activity Function.
Task 2: Get Vulnerabilities from Machines
# Task 2: Get Vulnerabilities from Machines (Parallel Processing)
$ParallelOutput = @()

$ParallelTasks =

foreach ($WorkItem in $machineRecordCollection) {
    $params = @{
        ClientId = $ClientId
        data = $WorkItem
    }

    $EncodedText = [Convert]::ToBase64String([System.Text.Encoding]::ASCII.GetBytes((ConvertTo-Json -InputObject $params -Depth 10)))
    $output = Invoke-DurableActivity -FunctionName "Get-Vulnerabilities" -Input $EncodedText
}
The second task will invoke the Durable Function "Get-Vulnerabilities" with a custom JSON parameter block that is Base64 encoded. This Function will be called against each machine returned from the list of the first task.
Let's take a look at the first of the called Activity Functions.
Get-Machines Activity Function: Device Discovery
This function is responsible for retrieving a list of active machines from the Microsoft Defender API. Key features include:
- Authentication using Azure AD tokens
- Pagination handling for large device lists
- Rate limiting consideration (2-second delay between requests)
- Data transformation to a consistent format
The function makes API calls to https://au.api.security.microsoft.com/api/machines and collects information such as:
- Device ID
- Device Name
- OS Platform
- OS Architecture
As Activity Functions are called by Orchestrator Functions, they type of binding is an activityTrigger binding and it's direction is inbound.
{
  "bindings": [
    {
      "name": "params",
      "type": "activityTrigger",
      "direction": "in"
    }
  ]
}
The corresponding PowerShell for this activity function has some interesting elements.
param($params)
$DebugPreference = 'Continue'
write-debug "(Get-Machines) ClientID = $($env:CLIENTID)"
$output = @()
$resourceURL = "https://api.securitycenter.microsoft.com/"
$Token = Get-AzureADToken -resource $resourceURL -clientId $env:CLIENTID
$authHeader = @{
'Authorization' = "Bearer $($token)"
}
$machineRecordCollection = @()
# Initial URL to retrieve a list of all active machines
$apiUrl = "https://au.api.security.microsoft.com/api/machines?`$filter=healthStatus+eq+'Active'"
do {
# Retrieve the current page
write-debug "Retrieving Machine List $($apiUrl)"
$response = Invoke-RestMethod -Uri $apiUrl -Headers $authHeader -Method Get
# Process each machine record in the current page
foreach ($machinerecord in $response.value) {
$tmpobj = [PSCustomObject]@{
DeviceId = $machinerecord.id
DeviceName = $machinerecord.computerDnsName
OSPlatform = $machinerecord.osPlatform
OSArchitecture = $machinerecord.osArchitecture
}
$machineRecordCollection += $tmpobj
}
Start-Sleep -Seconds 2 # account for Microsoft's API limit
# Check if there is a next page
$apiUrl = $response.'@odata.nextLink'
} while ($apiUrl -ne $null)
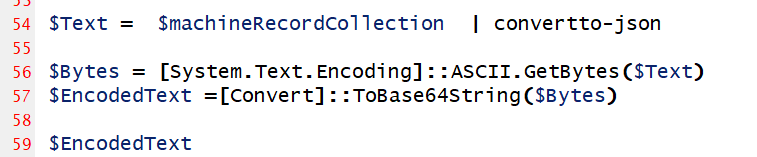
<#
Return machineRecordCollection as a base64 encoded string
#>
$Text = $machineRecordCollection | convertto-json
$Bytes = [System.Text.Encoding]::ASCII.GetBytes($Text)
$EncodedText =[Convert]::ToBase64String($Bytes)
$EncodedText Notice how the CLIENTID environment variable that was set using Bicep is exposed in PowerShell.

To be able to use Microsoft's APIs I need to get a token using the Client ID. I am using a custom written PowerShell function to get a token against the securitycenter API resource and passing the ClientID of my Managed Identity.
Anything in the 'modules' directory off the root of the FunctionApp project will automatically be loaded at run time.
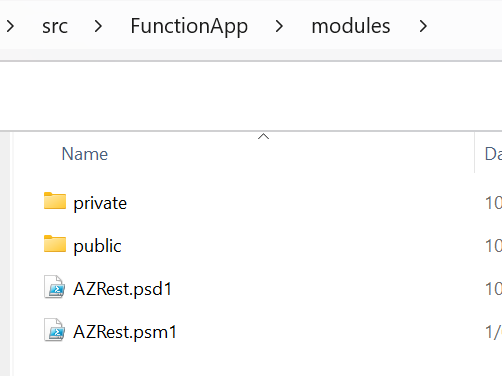
The PowerShell Module can be viewed here: https://github.com/LaurieRhodes/PUBLIC-Get-Defender-Vulnerabilities/tree/main/src/FunctionApp/modules/public
The next element of the code uses the received token within a REST header to get a list of all active machines.
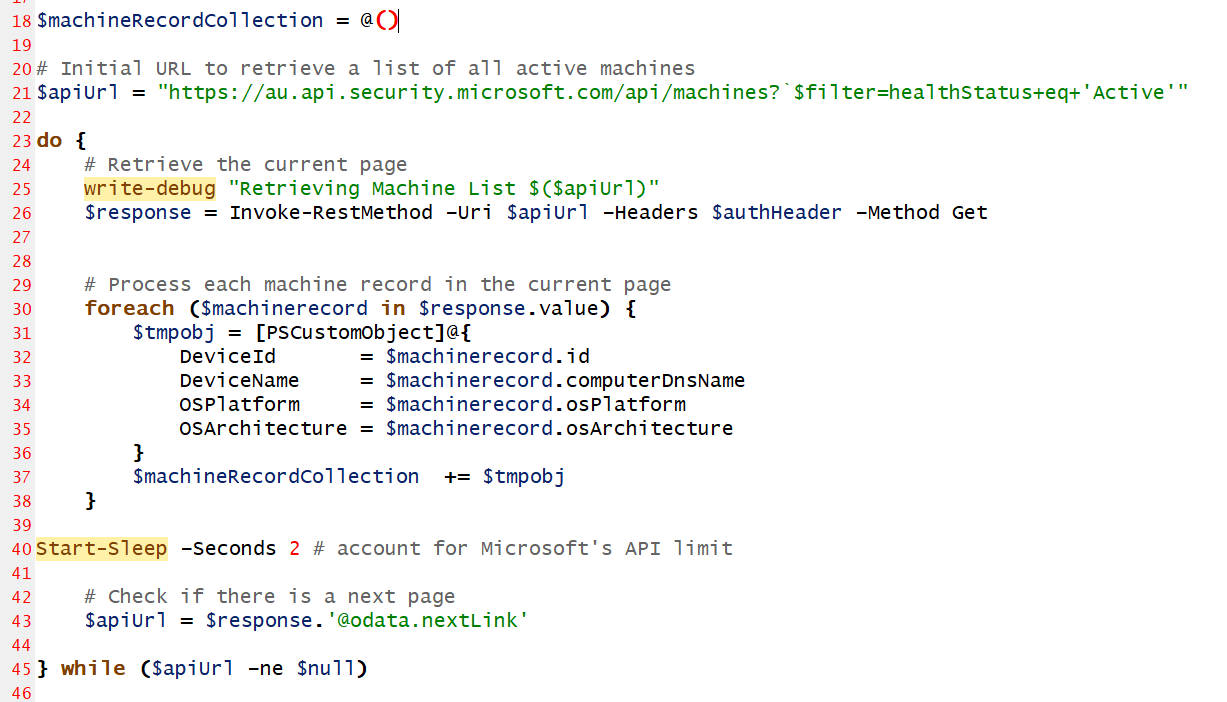
I create a custom Machine record for each machine retreived and add that to my collection of machines.
The final step is to pass the complete collection of machines back as a data set to the orchestrator after encrypting the JSON as a Base64 string.
We covered the Orchestrator code earlier. Lets look at the second Activity function that the Orchestrator calls with each machine record.
Get-Vulnerabilities Activity Function: Vulnerability Processing
This is the most complex component of the application, responsible for:
- Retrieving vulnerability data for each machine
- Transforming the data into a structured format
- Sending the processed data to Azure Event Hub
The function defines a custom class DeviceTvmSoftwareVulnerabilities to structure the vulnerability data:
class DeviceTvmSoftwareVulnerabilities {
    [String]$DeviceId
    [String]$DeviceName
    [String]$OSPlatform
    [String]$OSArchitecture
    [String]$SoftwareVendor
    [String]$SoftwareName
    [String]$SoftwareVersion
    [String]$CveId
    [String]$VulnerabilitySeverityLevel
    [String]$RecommendedSecurityUpdate
    [String]$RecommendedSecurityUpdateId
    [String]$CveTags
    [String]$CveMitigationStatus
}
This object structure aligns with Microsoft's Defender table structure from the Azure portal.
$resourceURL = "https://api.securitycenter.microsoft.com/"

$Token = Get-AzureADToken -resource $resourceURL -clientId $env:CLIENTID

$authHeader = @{
    'Authorization' = "Bearer $($token)"
}

    $OutputArray=@()

    $apiUrl = "https://au.api.security.microsoft.com/api/vulnerabilities/machinesVulnerabilities?`$filter=machineId+eq+'$($DeviceId)'"
This script uses the machine vulnerabilities API with the Device ID from the initiating parameter object to get a complete list of vulnerabilities. Notice that I am using the Australian API endpoint for Microsoft security - that might need to change for your closest location.
The remainder of the script sends each vulnerability to my Event Hub. I've opted to use PowerShell to directly to send events to my Event Hub although Event Hubs are a service that can be directly bound to with Function Apps so you could use a binding directly with the Push-OutputBinding command. More about PowerShell and Output Bindings may be read here: https://learn.microsoft.com/en-us/azure/azure-functions/functions-reference-powershell?tabs=portal
$EventHubresourceURL = "https://eventhubs.azure.net" # The resource name to request a token for Event Hubs
$EventHubURI = "https://$($EventHubNameSpace).servicebus.windows.net/$($EventHubName)/messages?timeout=60"

$EventHubtoken = Get-AzureADToken -resource $EventHubresourceURL -clientId $env:CLIENTID

$EventHubheader = @{
    "Authorization" = "Bearer $($EventHubtoken)"
    "Content-Type" = "application/json"
}


  # Process each machine record in the current page
  foreach ($machinerecord in $machineRecordCollection) {

      $DeviceId  = $machinerecord.DeviceId
      $DeviceName = $machinerecord.DeviceName
      $OSPlatform = $machinerecord.OSPlatform
      $OSArchitecture = $machinerecord.OSArchitecture

     $vulnerabilities =  Get-MachineVulnerabilities -DeviceId $DeviceId -DeviceName $DeviceName -OSPlatform $OSPlatform -OSArchitecture $OSArchitecture

     foreach ($vulnerability in $vulnerabilities){
        $vulnerabilityCollection += $vulnerability
        Invoke-RestMethod -Uri $EventHubURI  -Method POST -Headers $EventHubheader -Body $(Convertto-json -inputobject $vulnerability) -Verbose -SkipHeaderValidation
        write-debug "Event Hub data sent"
     } # End foreach Vulnerability

 }  # End Vulnerabilities
Azure Data Explorer and Event Hubs
I've previously written about how to derive Microsoft's table schemas for use with Azure Data Explorer.
- To create the DeviceTvmSoftwareVulnerabilities table schema for ADX, take a look at this blog: Creating ADX table Schemas for Defender, Entra and Microsoft Sentinel
- The process of connecting an Event Hub to Azure Data Explorer is discussed here: Adding data streams to Azure Data Explorer
Additional points to note...
- Also included is an HTTP Trigger Function that can be used to start Orchestrations. Although my standard application will run on a timer, I need a method of triggering the Orchestrator for development and testing. This lets me develop and run the Orchestrator directly from the Azure Portal.
Take some time to look at the host.json file off the root of the Durable Function App. There is a lot that can be customised in it... see Microsoft's formal documentation: https://learn.microsoft.com/en-us/azure/azure-functions/functions-host-json
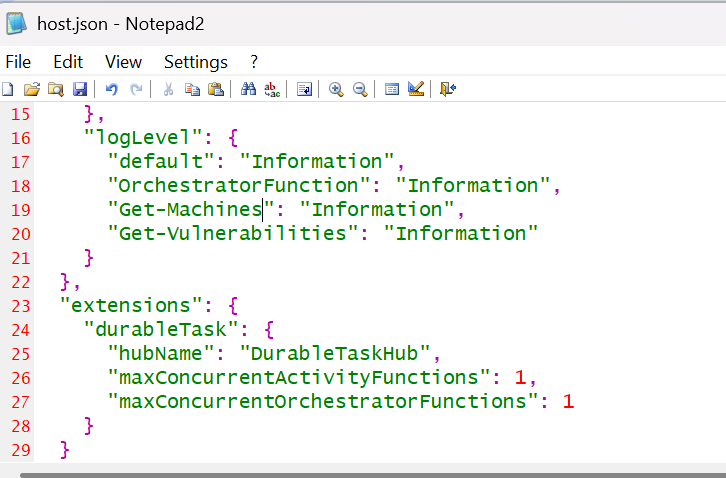
Notice how we can set the default log level on each of the Functions. Also note how the number of Orchestrators and Activity Functions that can run at any time are set within the applications.
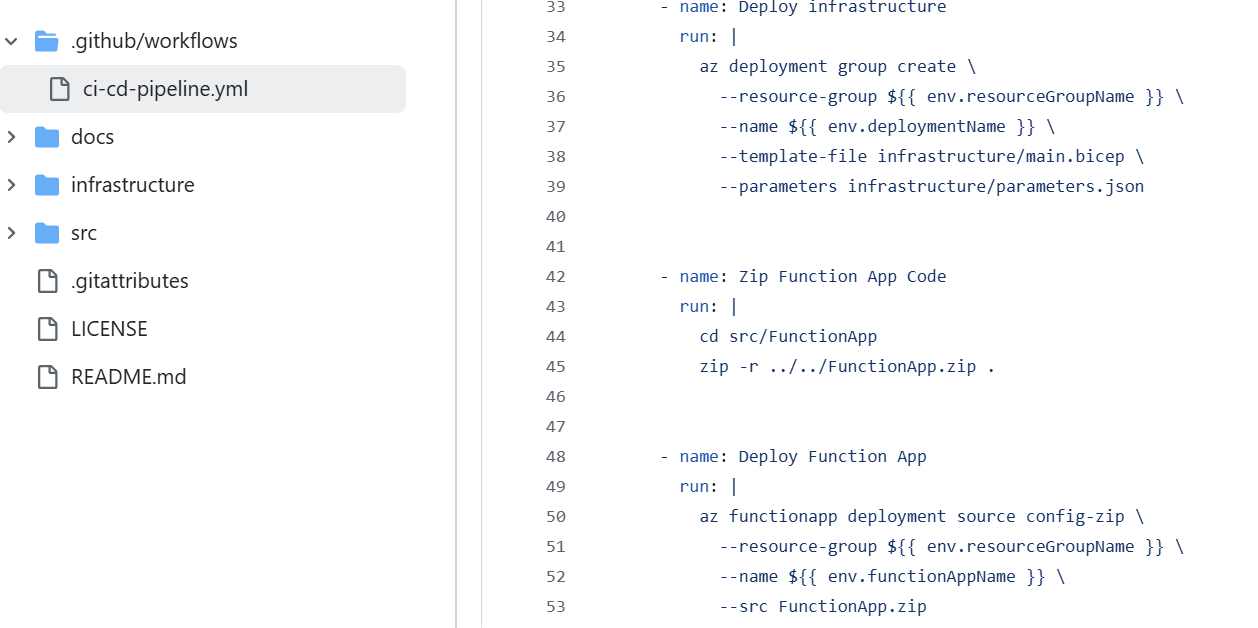
There are three steps involved to deploying a Function App. You have to deploy the Azure Infrastructure with Bicep. Secondly, you must zip the Application files. Lastly you deploy the zip file onto the running Function App Infrastructure.
- It is possible to write Defender data directly to ADX without the Event Hub, either using Bindings or custom code. This is not preferred as you lose a degree of fault tollerance with record writing but certainly an option for a home sandpit and development testing.
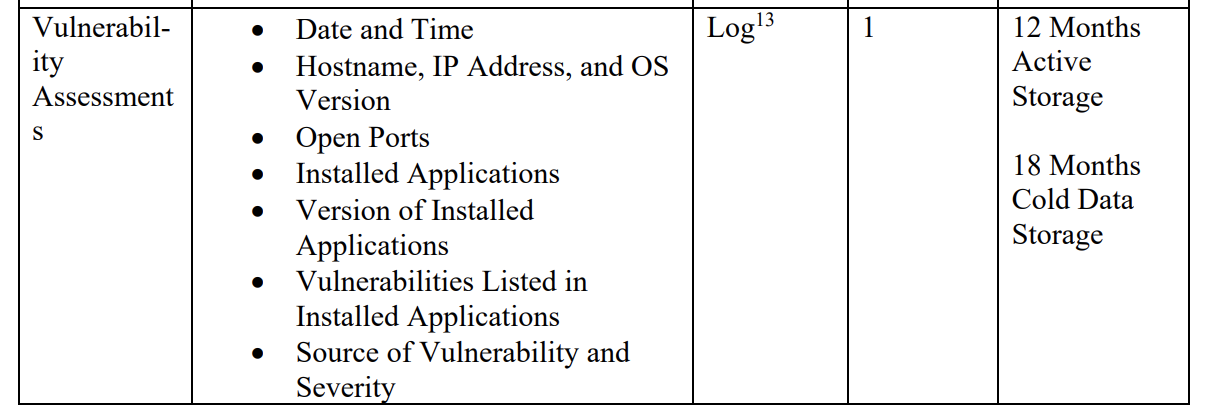
This has been a long post with a lot to take in. What is achieved though is the ability to retain all vulnerability data in a cost effective solution that meets M-21-31 storage expectations.
- Log in to post comments